ReadyBoost is a little-known Microsoft technology created way back for Vista and was included in newer versions of Windows. It utilizes free space on fast removable devices to augment system memory.
I usually use this service to make my family members' old computers or laptops faster by inserting a flash drive or a memory card and activating ReadyBoost. But you should know that this feature is not available for all systems.
If you have not heard of ReadyBoost or how to use it, this guide will help you get the most out of this Windows utility.
What Is ReadyBoost?
ReadyBoost is a Windows program that caches frequently used files. It stores this cached data on your removable devices, such as flash drives, CompactFlash memory cards, and Secure Digital. Microsoft first introduced ReadyBoost in 2007 with the promise of accelerating the performance of Windows Vista. But, to be honest, the claims fell flat for most of us. Thankfully, this utility actually does work in Windows 7, 8, and 10.
How Does It Improve Windows 10 Performance?
This program works in conjunction with SuperFetch, a service that uses an algorithm to decide which files should be kept in the cache. For example, the cache could be application files, system files, and user documents. When you launch ReadyBoost, Windows 10 uses your flash drive's memory as RAM. In any case, RAM is what influences the system speed. So, when your Windows 10 needs to access frequently used files, it fetches it from the disk drive instead of the RAM.
The data stored in the ReadyBoost cache is safe, as it is protected using the 128-bit AES encryption standard by default. But you can deactivate the encryption to simplify its functionality and reduce CPU cycles. Unfortunately, the procedure is complicated, and you should use it at your own risk. In case you're still interested, here is a link on how to do it: https://www.cleansoft.lv/disable-readyboost-encryption-and-compression/
Important Points to Note
So far, ReadyBoost is a great speed-boosting utility, but there is a catch; RAM is usually faster than USB storage. So, don't assume ReadyBoost will turn an ages-old Celeron into a brand-new core i7 machine. ReadyBoost makes the system run faster, but it usually depends on the setup. For example, this disk caching feature is beneficial if your system runs a slow hard drive or has a small amount of RAM. Also, if you run Windows 10 on fairly standard hardware, then ReadyBoost will offer a nice performance enhancement.
But, if you are running your Windows 10 on high-end hardware with a top-of-the-range i7 or i9 CPU, then ReadyBoost won't offer much help. If you have enough RAM, then it is better to store SuperFetch data on your system's RAM than on a USB flash drive.
How Does ReadyBoost Work
Just to clarify what we touched on above, ReadyBoost does not speed up RAM or process but enhances hard drive access times for minor random reads. It is also important to remember that ReadyBoost is just a helper tool for SuperFetch. Therefore, its impact is most noticeable when starting huge disk-intensive applications, such as Microsoft Outlook, Adobe Photoshop, etc.
SuperFetch is a disk cache management system that enhances Window's responsiveness when loading and switching between frequently used programs. The way it works is that SuperFetch constantly monitors system data for these programs and preloads them into the cache to be loaded faster into RAM. For instance, the Chrome browser is the first program I use every time I start my Windows computer, so SuperFetch loads Chrome files on the RAM to minimize the launch time.
The SuperFetch technology works perfectly while using the computer's hard disk for the cache, but as you know, hard disks rely on physically moving parts. This often limits the speed at which data is transmitted between RAM and the cache. This is where ReadyBoost comes into play, storing application data and files as cache in removable devices.
ReadyBoost Requirements
We have discovered that you can use both USB 2.0 and USB 3.0 ports with this feature on your desktop, as long as you have a USB flash drive for ReadyBoost. But since the USB 3.0 port is much faster, we recommend using it. You can also use a memory card for laptops.
For it to work, you need to use a memory card or USB stick with at least 1 gigabyte of free space, depending on your RAM. So follow this rule of thumb: If your PC uses 1 gigabyte of built-in RAM, then your flash drive should have about 2 - 4 gigabytes of free space. The good thing is that you might not need to do any tests since Windows 10 automatically checks the performance of removable hardware.
If you are running a 32-bit version of Windows 10 and on FAT32 file system disks, you can only use up to 4 gigabytes of storage space for ReadyBoost, even if the disk is larger. You can also use the older FAT16 file system, but you can only use up to 2 gigabytes of cache size.
For 64-bit Windows, you can create up to 32 gigabytes of the cache, and it can be created on an NTFS-formatted removable device. Windows 10 can also support the exFAT file system for ReadyBoost.
How to Enable ReadyBoost
Now that you know how the ReadyBoost feature works, let's activate it in Windows 10. To make sure that your PC is ready to use the ReadyBoost feature, you have to ensure that the SuperFetch or SysMain (depending on the Windows 10 version you are running) service is active. If you use Windows 10 version 1809 or later, the service is called SysMain.
Additionally, as we stated earlier, you need to make sure your computer meets the minimum requirements. To use ReadyBoost, you need an SD memory card, USB flash drive, or CF card. Your system will use any of these removable devices as a hard drive to boost disk read performance.
How Check the Status of The SuperFetch Service?
To check the status of the SysMain/SuperFetch service, follow the steps below:
- Press the Windows + R shortcut on your keyboard to open the Run dialog box.
- Type services.msc into the text box and press Enter.
- Now, scroll down the results list until you spot SuperFetch or SysMain.
- Check if it is active by right-clicking on it and then left click on the properties. It should be set to "Automatic" on the startup type, and the service status needs to say "Running" and set to start automatically.
If everything is okay, then you are almost ready to set up an SD memory card or USB flash drive for use with ReadyBoost. What you need to do next is to turn on the ReadyBoost feature in Windows 10.
How to Turn on ReadyBoost in Windows 10
Follow the steps below to activate the ReadyBoost feature on your device:
- Insert the removable device you want to use with ReadyBoost. It could be a USB flash drive or SD memory card.
- Open the File Explorer utility by pressing the Windows and E keys simultaneously. Alternatively, you can search for File Explorer on the Taskbar.
- Next, navigate to the removable device you want to use with ReadyBoost.
- Once you have located the desired drive, right-click on it and then click on the Properties option.
- After that, navigate to the ReadyBoost tab. The system will take a few seconds to analyze the drive. If the device is not compatible, you will receive a message with the details informing you that the disk does not have the minimum performance characteristics for ReadyBoost. Likewise, if your system has an SSD, you may also get a message informing you that the device cannot be used for ReadyBoost. But why this? The main reason is that a system with an SSD drive can outperform ReadyBoost. In that case, ReadyBoost won't offer much value in this situation.
- If your removable device is compatible with ReadyBoost, the system will prompt you to enable this feature. You will see three options that help you to configure your USB drive for ReadyBoost. But first, you need to reformat the drive. I suggest you format your drive using the exFAT system instead of NTFS. The former was designed for flash drives.
- Choose the option you want to use, as shown in the screenshot below. If you aren't using your USB for any other purpose, then choose the "Dedicate this device to ReadyBoost" radio button. Otherwise, choose the "Use this device" option. Since these storage devices are super affordable nowadays, I recommend you dedicate them fully to ReadyBoost. This way, you won't struggle to locate your work files amid the ReadyBoost cache.
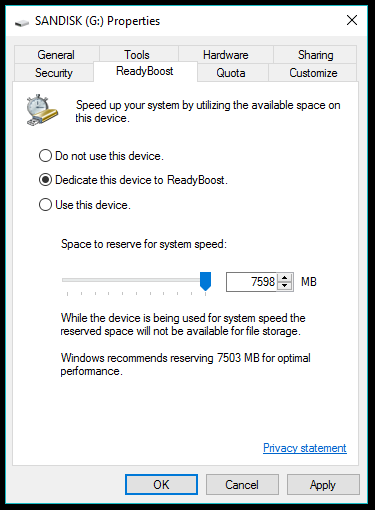
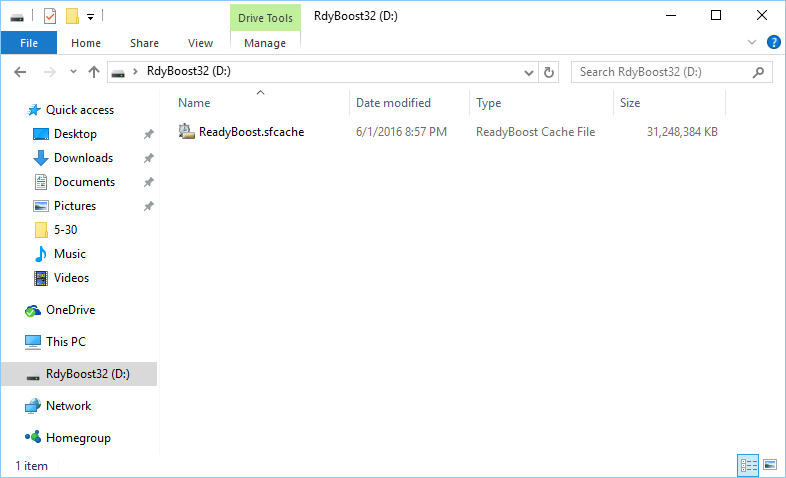
- To activate your selection, click OK. From here, Windows will automatically configure the USB drive or whatever removable device you used to create the caching system. It does so by creating the disk cache file ReadyBoost.sfcache, which is usually found in the root of the flash disk.
Important Note: Once a drive is set up with ReadyBoost, it will lock the drive space until you turn off the feature.
How to Turn Off ReadyBoost
If, for whatever reason, you decide that you no longer need ReadyBoost. For instance, if you upgrade to a faster computer. Don't worry because you can always stop the feature. Here is the process:
- Follow through from Step 1 to Step 5 from the above section to take you to your ReadyBoost driver's properties.
- Once there, choose the first radio button, which reads: "Do not use this drive."
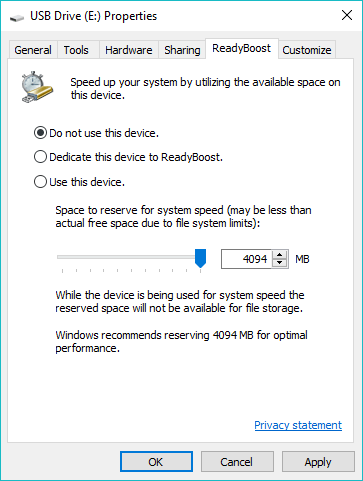
- After that, click OK to activate the changes.
- You must also manually erase any ReadyBoost files stored in your removable drive.
How to Check the Performance of ReadyBoost
You may also be interested in keeping an eye on the performance of Windows 10 ReadyBoost. To check its performance, use the Windows Performance Monitor:
- Hit on the start menu and search for Performance Monitor. Another way to open the Performance Window is to visit This PC, then on the left side right-click on "This PC" and then click Manage. After that, go to Performance > Monitoring Tools > Performance Monitor.
- Next, add the ReadyBoost counter to this Windows utility by clicking the green plus (+) button.
- Once the Add Counters window opens, scroll down the list of available counters until you find the ReadyBoost cache.
- Highlight it, then click the Add button and then OK to save the changes.
- Now, you can monitor the ReadyBoost cache in use.
What About Using Linux to Improve Speed
If you still have an old PC with performance issues, don't write it off just yet. You can, of course, enhance its performance with ReadyBoost. But if the idea of disks and changing settings in your system seems too cumbersome, then there is a simpler option. The thing I'm talking about is called Xtra-PC, and it's a USB drive that has a fast Linux operating system on it. Once plugged in, it bypasses your slow Windows and boots into this fast Linux instead.
If you want, you can read our full review of Xtra-PC to find out if it's for you.
This Linux distribution-based system will give your old computer a new lease on life. It is designed with simplicity in mind, so it is ideal for non-techie guys. Xtra PC is also optimized for popular platforms, such as Amazon Prime Video, Facebook, and Netflix. Other web-based products and services, such as Google Docs. It works just like in any other operating system.
Besides simplifying things for non-technical people, extra-pc comes with several popular features. I tried this product on a few XP-era PCs and didn't need any drivers. The only challenge is that you must stop using Windows and learn the Xtra PC's way of doing things. Even though they are quite similar, some things are still different.
Summary
ReadyBoost's performance boost is pretty subjective, as it depends on the kind of application you are running on your PC and the type of read/write operations that these applications execute. Moreover, the feature may not work on all systems. However, besides these few factors, ReadyBoost is a great utility to boost your computer's performance if you have a fast USB drive and run a system with low RAM.
Did you find this guide helpful? Share your thoughts and feedback with us in the comment section.

With the continual development and increase in technology, gadgets, and gizmos, Amar never has a dull day researching new gadgets. Being an enthusiastic gamer, traveler, soccer lover, and avid car driver means that he always looks for the next cool thing to try out.