Before we start with the guide on how to use Photo Stick for iPhone, let's first take a look at what this nifty little device can do.
Photo Stick for iPhone is an amazing little device that can help you free up storage on your iPhone by allowing you to store your photos and videos on it instead. This is perfect if you're running out of space on your iPhone or just want to keep your photos and videos backed up if something happens to your phone.
Not that that's out of the way, let's begin with the guide on how to use Photo Stick for iPhone!
Note: This guide is for devices bought after August 31st, 2020.
System Requirements
| iPhone | iPad |
|---|---|
| iOS 13.0 and later | iOS 13.0 and later |
Installing the App on Your iPhone/iPad
The first thing would be downloading their free app from the App Store. You can find the app by searching it on the App Store or by clicking on this link here:
- ThePhotoStick Omni (https://apps.apple.com/us/app/thephotostick-omni/id1572323348)
- ThePhotoStick Mobile (https://apps.apple.com/us/app/thephotostick-mobile-new/id1518878065)
Note: If you own ThePhotoStick Omni, then download the app that says "ThePhotoStick Omni," or if you have ThePhotoStick Mobile, then download "ThePhotoStick Mobile NEW"
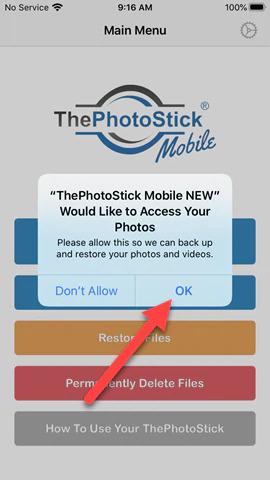
Once the app installs on your iPhone or iPad, you can then open it. After it's opened, it will ask you for the standard permissions that you need to accept. It needs those permission to access your Photos folder so it can backup and restore said photos and videos to your Photo Stick.
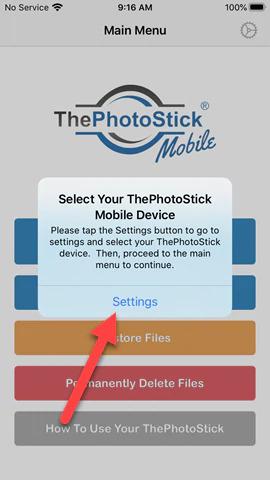
Plug in your Photo Stick and wait a couple of seconds until the iPhone discovers the Photo Stick. A popup will then ask you to select your photo stick device. To do so, just tap on the "Settings" button.
The app should then show you a list that says iCloud Drive, On My iPhone, and PHOTOSTICK. Next, you have to select PHOTOSTICK and press the Done button in the top right corner.
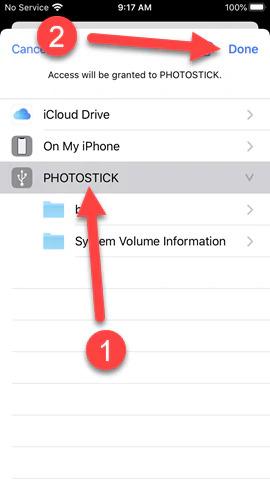
After that, check if the Photo Stick got recognized by the app. There will be a green checkmark icon next to the text, "ThePhotoStick device detected." Once everything is OK, you can return to Main Menu.
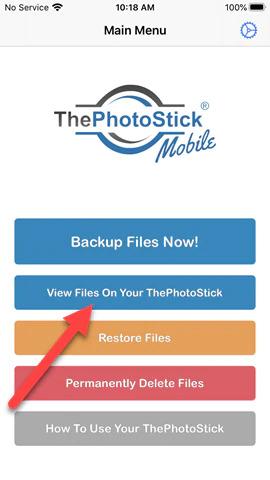
Photo Stick for iPhone App Interface
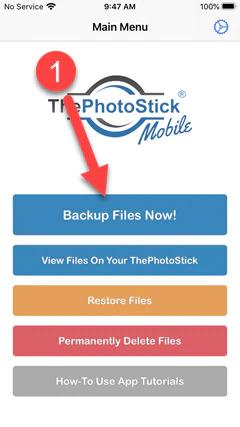
Before showing you how to use a photo stick for iPhone, let me first show you what each button means.
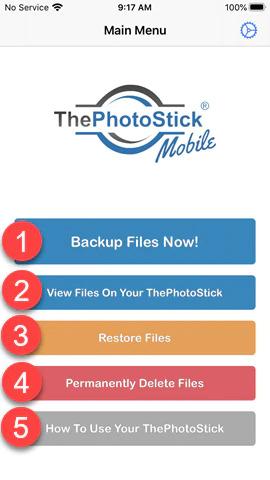
1. Opens up a new tab with blue buttons, "Backup all photos and videos" and "Select to backup."
2. Shows you images and videos that you have copied onto your Photo Stick
3. Opens a new window with two buttons: "Restore all photos and videos" and "Select to restore."
4. Shows you how to remove completely a recently deleted album from your iOS device.
5. Detailed instructions on how to properly use the app.
Starting a Backup of Your Photos and Videos
If your Photo Stick is still plugged in, it's ok, but if it's not, then you should first plug it in. Then from the main menu window, press the "Backup Files Now" button.
The next will show you two buttons, "Backup All Photos and Videos" and "Select to Backup." If you're using the app for Omni, it will say, "Backup All photos, videos, Music."
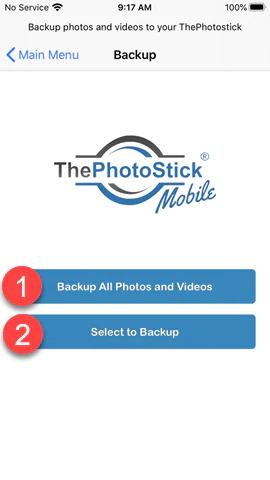
The first button will start the backup of all your files from the camera roll and iCloud, and the second button will ask you to select specific photos and videos you wish to backup.
Note: If you're using the Omni app to backup music, you have to save songs locally from iTunes.
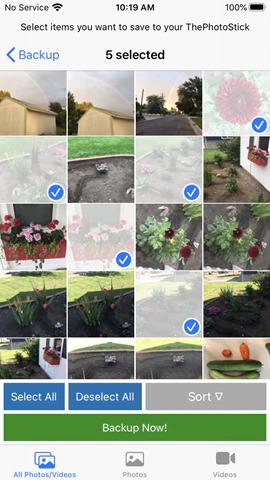
If you decide to tap on the "Select to Backup," it will open up all your photos and videos folder, where you have to choose which specific ones you want to save. On the bottom of the screen are 3 or 4 options, depending on which app you're using. The options are to view "All photos and videos," "Photos," "Videos," and "Music."
Note: The tab "Music" is only available if you have ThePhotoStick Omni and use the Omni app.
When you have decided which items you want to backup, then you should tap the green "Backup Now!" button, and it should take you to a new screen where it will show the progress of the backup.
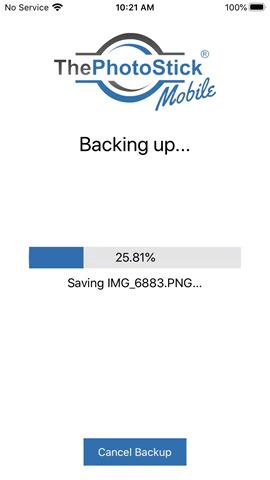
After it reaches 100%, it will take you to a new screen showing you the summary of the process.
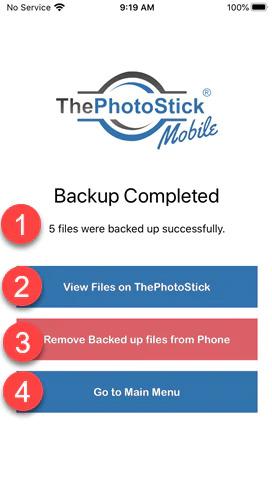
1. It shows how many files have been backed up successfully.
2. As the name suggests, the "View files on ThePhotoStick" button will show you all the files you have backed up on your photo stick.
3. The red "Remove Backed up files from Phone" button will delete the files you just backed up from your iPhone or iPad. Doing this will move the files to the iPhone's "Recently Deleted" folder, which will not free up space. To free up space, you have to delete everything from the "Recently Deleted" album.
4. It Brings you back to the main menu.
Viewing backed up files on the ThePhotoStick
This is possible in two ways. The first is directly from the app while the device is plugged into your phone, and the second is from your PC or Mac.
In order to view stored files on the photo stick, press the blue button that says "View Files On Your ThePhotoStick."
Once you see all the images and videos, you can tap on one of them to see a larger photo or play a video.


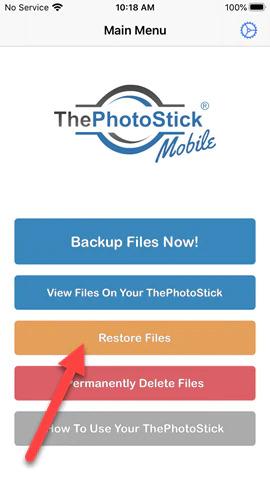
Restoring Photos and Videos
On the main menu screen, you will find a yellow button that says "Restore Files," and once you press the button, it will show you two options:
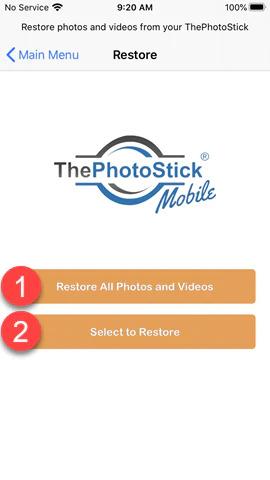
- Restore All Photos and Videos. This will start the process of copying all of the files from the photostick to your iOS device.
- Select to Restore. This option enables you to select specific images or videos that you wish to copy back to your smartphone.
Taping the "Select to Restore" will open up a new screen where you can select what you want to restore. On the bottom of the screen are buttons that allow you to view all photos/videos or just photos or videos.
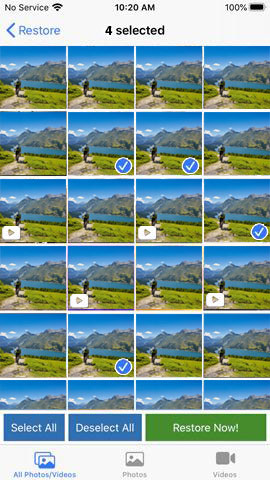
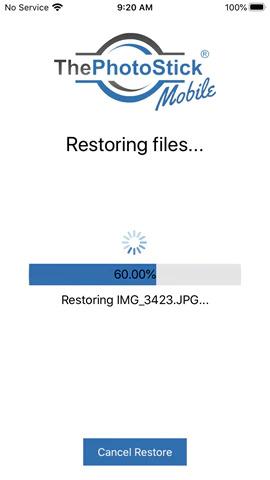
After you decide what files to restore, you can press the green button that says "Restore Now!" and it will take you to the restore process screen.
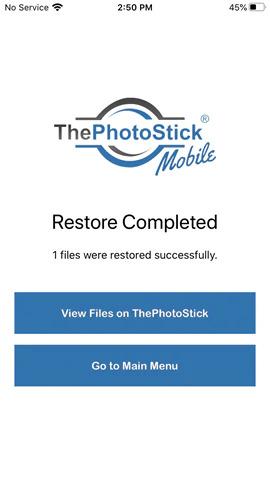
Once it's all finished, it will take you to a "Restore Completed" screen that shows you how many files have been restored and two blue buttons, one for viewing files on thephotostick and the second for going back to the main menu.
Conclusion
I hope this tutorial on how to use photo stick for iPhone has helped you to make a backup of your photos and videos. Whether you are using the Omni or the original Mobile version, having an extra copy of your precious photos and videos is always a good idea. So be sure to back up regularly and enjoy peace of mind knowing that your cherished memories are safe and secure.
If you have any questions feel free to leave a comment below!

Nerko is a writer for Zoopy, and he's been working there since 2019. He loves to ride his motorcycle and bicycle, especially in the summertime! He also enjoys watching science fiction movies, and his favorite movie is Interstellar. Nerko is also a competitive gamer - so if you're looking for a good competition, he's your man!
I’m 70years old all I want to do is save my photos from my phone is their a easy way todo that
The easiest way would be to have someone do it for you, someone young and tech savvy. Do you have someone like that in your family?